The Remote Edit Dashboard supports logging in with an Active Directory(AD)/LDAP user. This allows users to login with the same credentials that they use to login to the remote workstation, providing a more seamless experience.
Configuring the dashboard for AD/LDAP logins
Setting up the connection
The AD/LDAP login feature will usually be configured and tested by 7fivefive support, however the guide below details how to make changes to these settings and test the connection.
-
Login to the Remote Edit Dashboard as a user with the
administratorrole -
In the side menu, under the
Settingssection, select theSettingsbutton -
Navigate to and expand the
Authenticationsection, go to theActive Directory/LDAP settingssection -
Enable the
Enabletoggle -
In the
Server FQDN or IPfield, enter the IP address or fully qualified domain name of a domain controller -
In the
Domain base DNfield, enter the distinguished name (DN) for the base of the domain -
In the
User search base DNfield, enter the DN of the organisational unit (OU) where the domain’s users are stored. -
In the
Group search base DNfield, enter the DN of the organisational unit (OU) where the domain’s groups are stored. -
In the
Bind userfield, enter the username of the user that will be used when making queries against the domain -
In the
Bind user DNfield, enter the DN of the user that will be used when making queries against the domain -
In the
Bind user passwordfield, enter the password for the user that will be used when making queries against the domain -
If LDAPS is required, enable the
Use LDAPStoggle -
Click the
Update settingsbutton near the bottom of the page
Testing the connection
If changes to the AD/LDAP settings have been made, the changes must be saved before testing the connection, otherwise the previous settings will be used.
-
Login to the Remote Edit Dashboard as a user with the
administratorrole -
In the side menu, under the
Settingssection, select theSettingsbutton -
Navigate to and expand the
Authenticationsection, go to theActive Directory/LDAP settingssection -
Click the
Test connectionbutton next to theServer FQDN or IPfield

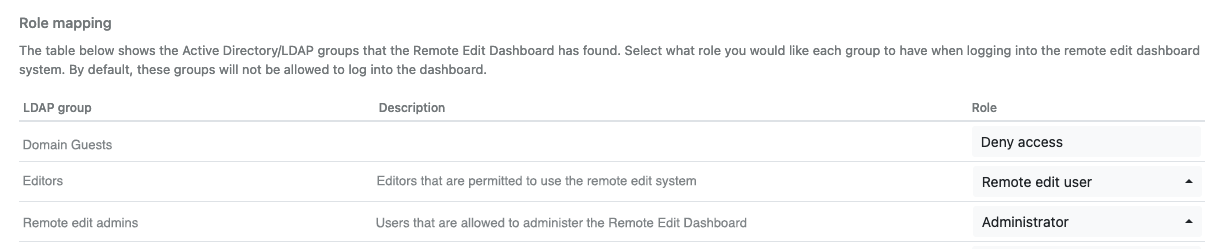
Role mapping
Once the connection to the AD/LDAP server has been made, all groups from within the OU specified in the Group search base DN field will be visible in the role mapping section. By default, new AD/LDAP groups are denied access to the system. The role mapping section allows you to specify what role each AD/LDAP group will get. The available roles are:
-
Administrator Allows the user to perform all operations on the dashboard.
-
Operator Allows the user to start and stop infrastructure and workstations, as well as create workstations from pre-defined profiles.
This role can also remove workstations. -
Power user Allows the user to view the system and workstation status.
This role can also stop, start and restart workstations. -
Read only Allows the user to view the system and workstation status.
-
Remote Edit User Provides the user with access to the Editor dashboard only.
-
Deny Prevents a user from accessing the remote edit dashboard.
Changing a role mapping for an AD/LDAP group
-
Login to the Remote Edit Dashboard as a user with the
administratorrole -
In the side menu, under the
Settingssection, select theSettingsbutton -
Navigate to and expand the
Authenticationsection, go to theRole mappingsection -
Find the AD group that you would like to update
-
Under the
Rolecolumn, select a new role from the drop-down box -
Click the
Update settingsbutton near the bottom of the page